Reading A Ruler |
|
 Self
Study Program, Self
Study Program,
"Welding Math and Science;" 87 Pages, Part # WMS
This program provides basic information to help
welding students and welding supervisors understand welding process
characteristics using basic math and science. Includes and Appendix with
Simplified Basic Math Functions and Metric Conversions.
CLICK to See Program Details
CLICK for Purchase Page
|
|
Reading a ruler
in US Measurement Units requires working with
Fractions. If the
Metric
System was being used it would not - more on
Metric below.
Rulers and
measuring tapes are commonly calibrated in feet and inches. Instead of
segmenting the foot into 10ths of a foot - it is divided into 12 parts
called inches.
 The inch is commonly split into 8, 16 or
sometimes 32 parts. Therefore working with
Fractions is a necessity. A
Fraction of an inch is a mathematical way of showing the number of the parts
into which it is divided. For example, 3/8 inches is a measure
of 3
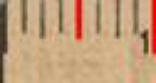
of the 8 parts. The picture left is an
example of an inch split into 8 parts or "eighths." The yellow arrow is
pointing to the third line from the start or the 3rd of 8 parts stated as
3/8. It’s shown with a division line between the numbers since we could divide 3 by 8 and get
0.375 the decimal value. If we always
stated the number of segments measured and the total number of segments into which
the inch mark was split, Fractions would be relatively easy.
Unfortunately it is not that easy! We'll try to make it as painless as
possible! The inch is commonly split into 8, 16 or
sometimes 32 parts. Therefore working with
Fractions is a necessity. A
Fraction of an inch is a mathematical way of showing the number of the parts
into which it is divided. For example, 3/8 inches is a measure
of 3
of the 8 parts. The picture left is an
example of an inch split into 8 parts or "eighths." The yellow arrow is
pointing to the third line from the start or the 3rd of 8 parts stated as
3/8. It’s shown with a division line between the numbers since we could divide 3 by 8 and get
0.375 the decimal value. If we always
stated the number of segments measured and the total number of segments into which
the inch mark was split, Fractions would be relatively easy.
Unfortunately it is not that easy! We'll try to make it as painless as
possible! |
|
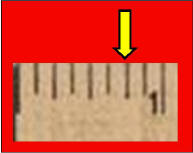
 The example on the right shows the 4th of the
1/8 inch marks in red. Since 4 is half way to 8 - it is the 1/2
inch mark. We could have said the 4/8 mark which is the same as saying 1/2 .
It is usually desired to display the Fraction
by having the lowest whole
numbers possible. The example on the right shows the 4th of the
1/8 inch marks in red. Since 4 is half way to 8 - it is the 1/2
inch mark. We could have said the 4/8 mark which is the same as saying 1/2 .
It is usually desired to display the Fraction
by having the lowest whole
numbers possible.
If the bottom
number (called the Denominator) can be divided by the number on top (called
the Numerator) and a whole number is the result
(no remainder) - the
Fraction would have the lowest number possible in the
Denominator.
 Looking
at the picture left and counting from the start or zero mark there are 6
spaces or 6/8 of an inch. Dividing 8 by 6 produces 1.333 which is NOT
a whole number (one with no decimal value left over.) However
both numbers can be made smaller. Any number or
Fraction can be
multiplied or divided by 1 without changing its value. This can be
accomplished by multiplying or dividing both the
Numerator and
Denominator
by the same number. Both the Numerator and
Denominator could be
multiplied by 2 (actually 2/2) that would give 6 * 2= 12 for a
Numerator and
8 * 2 or 16 for the
Denominator. The
Fraction would become 12/16; this
is the identical value as 6/8.
That would be accurate and a person could be told to say
"cut a
steel rod 12/16 of an inch long."
However the objective is to have the smallest numbers. Both
Numerator and
Denominator could be divided by 2. That would give 6/2 = 3 for a
Numerator and 8/2=4 for a
Denominator. The
Fraction now becomes 3/4.
It is the same value as 6/8 but with smaller numbers. Notice on the
ruler
some lines are longer than others. In this case the longest lines are quarters
of an inch rather than eighths. Three of these longest (quarter) lines could have
been counted and
the proper value found more quickly as the third quarter or the 3/4 mark! Looking
at the picture left and counting from the start or zero mark there are 6
spaces or 6/8 of an inch. Dividing 8 by 6 produces 1.333 which is NOT
a whole number (one with no decimal value left over.) However
both numbers can be made smaller. Any number or
Fraction can be
multiplied or divided by 1 without changing its value. This can be
accomplished by multiplying or dividing both the
Numerator and
Denominator
by the same number. Both the Numerator and
Denominator could be
multiplied by 2 (actually 2/2) that would give 6 * 2= 12 for a
Numerator and
8 * 2 or 16 for the
Denominator. The
Fraction would become 12/16; this
is the identical value as 6/8.
That would be accurate and a person could be told to say
"cut a
steel rod 12/16 of an inch long."
However the objective is to have the smallest numbers. Both
Numerator and
Denominator could be divided by 2. That would give 6/2 = 3 for a
Numerator and 8/2=4 for a
Denominator. The
Fraction now becomes 3/4.
It is the same value as 6/8 but with smaller numbers. Notice on the
ruler
some lines are longer than others. In this case the longest lines are quarters
of an inch rather than eighths. Three of these longest (quarter) lines could have
been counted and
the proper value found more quickly as the third quarter or the 3/4 mark!
|
|
 If
two Fraction dimensions are to be added (or subtracted) the numbers in the
Denominator (bottom numbers) must be the same.
Suppose two items are to be measured and a total length presented. If
one is 3/4 inches and the other 3/8 inches what is the total length?
Quarters and eights can not be added directly. It is best to convert
all measurements to the largest
Denominator, 8ths in this case. Therefore 3/4 becomes 6/8
(remember the
Numerator and
Denominator can always be multiplied by the same
number which is actually multiplying the
Fraction by 1.) The addition
is then with 6/8 + 3/8. The picture left shows the answer graphically. But
let’s get the answer using math. To add
Fractions, 6 of
the eight parts are being added to 3 of the eight parts. So only add the
Numerator
values (top
numbers.) Therefore 6 + 3 = 9 or 9 eights. Stated as a
Fraction, 9/8.
Whenever the
Numerator is bigger than the
Denominator the
Numerator can be
divided by the
Denominator to change to a whole number and possibly a
Fraction remainder. In this case, 8 goes into 9
once with one left over or 8/8 + 1/8 or 1 1/8 inches. This mark can be
seen on the ruler as one space after 1 inch. There would be nothing
wrong with saying the answer was 9/8 but suppose the result was 13 inches
and 3/8 inches. It could be stated as 13 * 8 or 104/8 + 3/8 or 104 + 3
=107/8. If it was necessary to measure using that dimension, 104
would be a lot of 1/8’s for someone to count! If
two Fraction dimensions are to be added (or subtracted) the numbers in the
Denominator (bottom numbers) must be the same.
Suppose two items are to be measured and a total length presented. If
one is 3/4 inches and the other 3/8 inches what is the total length?
Quarters and eights can not be added directly. It is best to convert
all measurements to the largest
Denominator, 8ths in this case. Therefore 3/4 becomes 6/8
(remember the
Numerator and
Denominator can always be multiplied by the same
number which is actually multiplying the
Fraction by 1.) The addition
is then with 6/8 + 3/8. The picture left shows the answer graphically. But
let’s get the answer using math. To add
Fractions, 6 of
the eight parts are being added to 3 of the eight parts. So only add the
Numerator
values (top
numbers.) Therefore 6 + 3 = 9 or 9 eights. Stated as a
Fraction, 9/8.
Whenever the
Numerator is bigger than the
Denominator the
Numerator can be
divided by the
Denominator to change to a whole number and possibly a
Fraction remainder. In this case, 8 goes into 9
once with one left over or 8/8 + 1/8 or 1 1/8 inches. This mark can be
seen on the ruler as one space after 1 inch. There would be nothing
wrong with saying the answer was 9/8 but suppose the result was 13 inches
and 3/8 inches. It could be stated as 13 * 8 or 104/8 + 3/8 or 104 + 3
=107/8. If it was necessary to measure using that dimension, 104
would be a lot of 1/8’s for someone to count! |
|
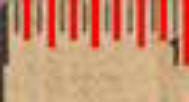 A
1 inch ruler mark is often split into 16
segments. These smaller
marks are still easy to read (compared to 32 marks which are used for some
steel rulers.) The picture left shows this segmentation with
the 1/8 inch marks and the 1/4 inch marks shown as longer red
lines. The
1/16 inch marks, shown in black, are the shortest. This makes it
easier to read quickly. A
1 inch ruler mark is often split into 16
segments. These smaller
marks are still easy to read (compared to 32 marks which are used for some
steel rulers.) The picture left shows this segmentation with
the 1/8 inch marks and the 1/4 inch marks shown as longer red
lines. The
1/16 inch marks, shown in black, are the shortest. This makes it
easier to read quickly.
A tape measure is the same as a ruler except
it is longer and flexible. There are also some interesting things to
note about most metal tapes.
The picture left is a
magnified section of a ruler.
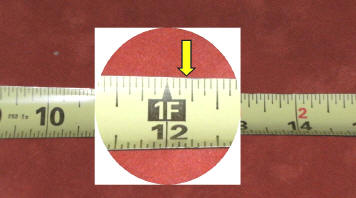 This ruler is segmented into
1/16ths or 16 segments in an inch.
It is also labeled in feet as
well as inches. If a measurement is to be made to the yellow arrow it
is located at the 12 inch or 1 foot mark plus 3 spaces. therefore
there are 12 inches and 3/16 inches from the end of the ruler to the yellow
mark. The mark is said to be 12 and 3/16 inches or 1 foot 3/16
inches-both would be correct. This ruler is segmented into
1/16ths or 16 segments in an inch.
It is also labeled in feet as
well as inches. If a measurement is to be made to the yellow arrow it
is located at the 12 inch or 1 foot mark plus 3 spaces. therefore
there are 12 inches and 3/16 inches from the end of the ruler to the yellow
mark. The mark is said to be 12 and 3/16 inches or 1 foot 3/16
inches-both would be correct. |
|
 There
are a few other things that should be understood about a tape measure: There
are a few other things that should be understood about a tape measure:
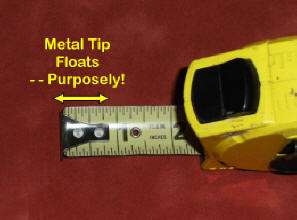
As seen in the picture right there is a metal
tab at the start end of the tape. It is usually attached with two rivets.
However it is loose. Do Not tighten these rivets with a hammer! The tab is loose for a reason.
I have talked with folks who think the ruler was made wrong and the rivet
was just not tight! That is wrong. It has a very useful purpose and
provides more accurate readings if used properly. It takes care of the
thickness of the metal tab when making outside and inside measurements.
We'll explain.
|
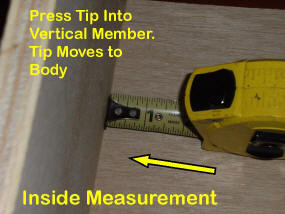 If you’re making
what is known as an “inside” measurement (picture left) - after the
tape is locked in position (with the black button on top) - the tape is pushed
with a slight force into the part to be measured. The looseness in the
tab is designed to take care of the thickness of the metal tab "IF" it is
pushed slightly to the vertical item being measured. The tab moves in
toward the ruler and provides an accurate measurement by properly
positioning the zero location. If you’re making
what is known as an “inside” measurement (picture left) - after the
tape is locked in position (with the black button on top) - the tape is pushed
with a slight force into the part to be measured. The looseness in the
tab is designed to take care of the thickness of the metal tab "IF" it is
pushed slightly to the vertical item being measured. The tab moves in
toward the ruler and provides an accurate measurement by properly
positioning the zero location. |
|
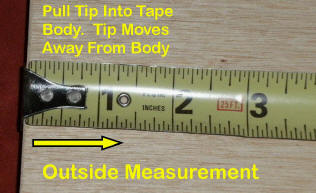 In
the photo right, the tape is being used to measure from the "outside" edge of
an item. In
the photo right, the tape is being used to measure from the "outside" edge of
an item.
The tape is pulled slightly away from the edge being measured and the tab
moves slightly away from the tape measure body. It moves the thickness of the
tab so that the zero point is now on the inside or from the photo the right
side of the tab. This places the zero location as necessary to have it
measure properly. This movement is accounting for the thickness of the
metal tab.
|

The tape
measure body often has a number printed on the base. This is a value
that can be used when making an inside measurement.
The measured value is read where the tape enters the tape body and the value
of its width added to that reading. For this ruler it is 3 inches.
The number 3 is added to the measured value to get the total
measurement. |
|
Metric:
 Metric Units (now called
SI for international
Standard) are used by about every country accept the US. Many items
such as cars and trucks made and purchased in the US today use
SI dimensions, bolts etc! since parts
are made all over the world, many industries have standardized on metric or
SI units Metric Units (now called
SI for international
Standard) are used by about every country accept the US. Many items
such as cars and trucks made and purchased in the US today use
SI dimensions, bolts etc! since parts
are made all over the world, many industries have standardized on metric or
SI units
Metric
is actually a
simpler system and does not use
Fractions! All units are in 10ths. The
basic length measure is the meter (slightly longer that our yard.) The
preferred unit smaller than a meter is a 1000th of a meter called a millimeter
(the abbreviation is mm.) 100rdth of a meter is called a centimeter
(abbreviated as cm). A cm = 10 mm's. Everything is
expressed in 10ths or
multiples of 10. The ruler in the picture shows inches on top and
metric on the bottom. The top is segmented in 1/16th of an inch.
The metric is labeled centimeters with segments in millimeters. |
|
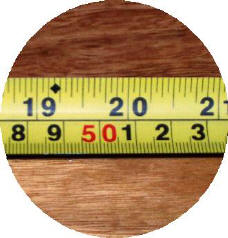
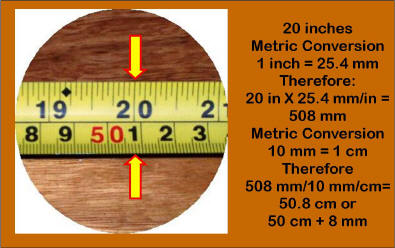 The picture
left shows a
conversion from 20 inches to metric. The ruler has
both US Units and metric units. As noted, 20 inches must be multiplied by
the conversion factor of 1 inch = 25.4 mm. Therefore 20 inches =
508 mm. Then 508 mm divided by 10 mm/cm = 50.8. Note all we have
to do to divide by 10 is move the decimal over 1 place. That yields
50.8. Or 50 cm and 0.8 cm. But a cm is 10 mm. So it could
be written as 50.8 cm or 50 cm + 8 mm. The picture
left shows a
conversion from 20 inches to metric. The ruler has
both US Units and metric units. As noted, 20 inches must be multiplied by
the conversion factor of 1 inch = 25.4 mm. Therefore 20 inches =
508 mm. Then 508 mm divided by 10 mm/cm = 50.8. Note all we have
to do to divide by 10 is move the decimal over 1 place. That yields
50.8. Or 50 cm and 0.8 cm. But a cm is 10 mm. So it could
be written as 50.8 cm or 50 cm + 8 mm.
Below are some Common Welding Metric
Conversions |
|
COMMON
METRIC WELDING CONVERSIONS |
|
TO CONVERT
FROM |
MULTIPLY BY |
TO OBTAIN
THIS METRIC TERM |
| inch (in) |
25.4 |
mm |
| foot (ft) |
305 |
mm |
| foot (ft) |
0.305 |
m |
| inches per
min travel (ipm) |
0.42 |
mm/sec |
| impact
(ft-lb) |
1.36 |
Joules |
| pound (lb) |
0.454 |
kg |
| ft3/hr (CFH) |
0.47 |
L/min |
| pressure
(psi) |
6.9 |
kPa |
| strength
(psi) |
0.0069 |
MPa |
| area (ft2) |
0.093 |
m2 |
| volume (in3) |
1640 |
mm3 |
| heat input
(J/in) |
39.4 |
J/m |
Welding Math and Physics PDF
|
|
There
is Much More Welding Math (and some Science) in Our 87 Page Self
Study Program,
"Welding Math and Science; Part # WMS
This program provides basic information to help
welding students and welding supervisors understand welding process
characteristics using basic math and science. Includes and Appendix with
Simplified Basic Math Functions and Metric Conversions.
CLICK for Purchase Page |
|