|
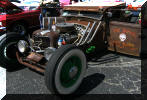
Guess I Built
What You Could Call A
Rat Rod!
 There
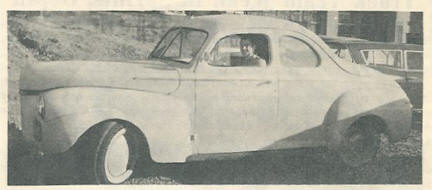
are a number of what are called "Rat Rods" showing up at car shows. My ’34
Street Rod is not one, however when looking at these cars, some remind me
of what I built as a teenager! We didn't call them "Rat Rods" but when
I recall the gray primer, unfinished engine compartment and many home made
parts, guess you could call it that! That's me in my 50's "Rat Rod."
The following are details of the car: There
are a number of what are called "Rat Rods" showing up at car shows. My ’34
Street Rod is not one, however when looking at these cars, some remind me
of what I built as a teenager! We didn't call them "Rat Rods" but when
I recall the gray primer, unfinished engine compartment and many home made
parts, guess you could call it that! That's me in my 50's "Rat Rod."
The following are details of the car:
|
|
Those Were The Days
In my early teens I was influenced by
two neighbors cars (well actually three.) The fellow directly across the
street was probably 5 years older than I and bought a 1950 Merc with a
chopped top. It was reportedly chopped by George
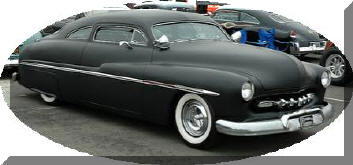 Barris
on the West Coast. I thought it was super cool and would look thorough the
garage window to see what he was doing to it. (Pic on left is not his but is
very similar. I remember those two teardrop spot lights and "frenched headlights")
I recall him telling me it was a real "lead sled" with lead cracking
in a number of spots! When he and his car club friends started to repair the “cracks”
one told me all the contours had so much lead that it was going to be
difficult to repair! They were going to remove the
lead and try to use mostly hammered sheet metal. Not sure how much they
accomplished. Barris
on the West Coast. I thought it was super cool and would look thorough the
garage window to see what he was doing to it. (Pic on left is not his but is
very similar. I remember those two teardrop spot lights and "frenched headlights")
I recall him telling me it was a real "lead sled" with lead cracking
in a number of spots! When he and his car club friends started to repair the “cracks”
one told me all the contours had so much lead that it was going to be
difficult to repair! They were going to remove the
lead and try to use mostly hammered sheet metal. Not sure how much they
accomplished.
I also recall that NJ Auto Inspection was very critical of his small windshield
height and would not allow the electric doors with a hidden button used to activate the solenoid that operated the latch!
They claimed “in case of emergency" the
police could not get in!! (Wonder how they feel about my new Vette which has
electric doors!!) He must have gotten past the windshield height but
had to make what were very creative door handles!  They installed a
round button in a curved recess they formed in the door for a handhold. It provided
the leverage to push the button with your thumb and pull the door open (schematic right).
I've always looked for something similar at car shows but have never seen
anything so neat. Guess we're all using electric doors and not
worrying about the emergency responders! They installed a
round button in a curved recess they formed in the door for a handhold. It provided
the leverage to push the button with your thumb and pull the door open (schematic right).
I've always looked for something similar at car shows but have never seen
anything so neat. Guess we're all using electric doors and not
worrying about the emergency responders!
Living next door to my ’50 Merc neighbor were
twins. They were pr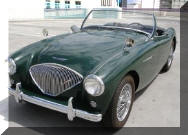 obably
10 years older than I so only knew them to say hello and look at their
cars. It was the mid 50’s and they just returned home from the Korean War. When
they came home they purchased two matching green 100-4 Austin Healeys! Even I
knew than the 90 HP 4 cylinder was not a lot of power, but they were so light,
they were pretty fast and they looked
so cool! Guess between the two (or three) cars it set the tone for the cars I
wanted, at least my long term desires. obably
10 years older than I so only knew them to say hello and look at their
cars. It was the mid 50’s and they just returned home from the Korean War. When
they came home they purchased two matching green 100-4 Austin Healeys! Even I
knew than the 90 HP 4 cylinder was not a lot of power, but they were so light,
they were pretty fast and they looked
so cool! Guess between the two (or three) cars it set the tone for the cars I
wanted, at least my long term desires.
|
|
The ‘41
In NJ you could get your license at 17. I was
working in a supermarket since I was 15 ½ so I had saved some money to buy a car
when I was 16 ½, which I did! Wanted one before I got my license. Pop wasn’t very happy
with the idea but it was my money. Looked around for a '40 Ford Coupe.
Being an avid reader of Hot Rod, Car Craft and some of the other smaller size magazines made
me think the’40 was just what I wanted. However there were very few to be had. There was
a '40 Merc convertible for sale but I didn’t like its looks. Never did like
convertibles and never owned one (accept for my CJ5, but that’s different.)
 A
classmate had a '41 Ford opera coupe he talked to me about and was willing to
sell. I went to look at it and although I d A
classmate had a '41 Ford opera coupe he talked to me about and was willing to
sell. I went to look at it and although I d didn't
like it as much as a ’40 it was an Opera Coupe and looked cool. It had a '50
Merc flathead with dual exhausts and the interior had been redone in Naugahyde (that was the
trade name for Vinyl!) It wasn’t the rolled and pleated trendy
treatment of the day
but it was well done. The car also ran and had no rust. There were some
things I needed to do and I had about 6 months before my license so there was
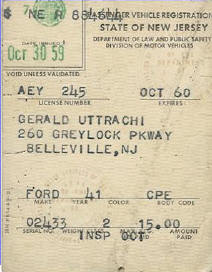
time. I was a Junior in High School and I attribute building the car
as being a big help
getting into College to obtain Engineering degrees. Between working on the car and working
in the supermarket to pay for all
the extra’s I wanted there was not a lot of time to get
in trouble. Well mostly! That's me on the right and the '41
coupe registration left. didn't
like it as much as a ’40 it was an Opera Coupe and looked cool. It had a '50
Merc flathead with dual exhausts and the interior had been redone in Naugahyde (that was the
trade name for Vinyl!) It wasn’t the rolled and pleated trendy
treatment of the day
but it was well done. The car also ran and had no rust. There were some
things I needed to do and I had about 6 months before my license so there was
time. I was a Junior in High School and I attribute building the car
as being a big help
getting into College to obtain Engineering degrees. Between working on the car and working
in the supermarket to pay for all
the extra’s I wanted there was not a lot of time to get
in trouble. Well mostly! That's me on the right and the '41
coupe registration left.
One of the first projects was to define
what to do with the rear seat, or lack there of. As mentioned, the front
seat was reupholstered in vinyl, green and white. The dash was painted white
and looked good. But there were no seats, or upholstery in the rear! It was an Opera
Coupe which meant it should have had two seats that attach to the rear
sides and hinged down. But there was nothing back there! Nothing on the sides or back, you
could see through to the trunk! Just a rear metal brace. What to do?
Decided no one was going to sit back there so why not just put a Tonneau
Cover in the rear! Made a wooden frame from some 1 X 4
 scrap wood. The
4 inch side faced up. It was flat on top and joined in the corners
with "corrugated nails" (photo left - not sure why I remember such trivia!) Shaped the rear of the
frame to fit
the curved interior headliner which extended below the rear window. Attached it with bolts hidden under the
vinyl covering to three “L” brackets that were
screwed into the metal side posts and the rear metal "X" brace. Attached it from
underneath to the bolts with wing nuts. To cover the wood it needed some padding scrap wood. The
4 inch side faced up. It was flat on top and joined in the corners
with "corrugated nails" (photo left - not sure why I remember such trivia!) Shaped the rear of the
frame to fit
the curved interior headliner which extended below the rear window. Attached it with bolts hidden under the
vinyl covering to three “L” brackets that were
screwed into the metal side posts and the rear metal "X" brace. Attached it from
underneath to the bolts with wing nuts. To cover the wood it needed some padding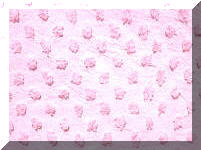 before stretching white Naugahyde over the frame. Foam was
readily available at the time and money was always an issue. Found some
great material that acted like foam. A scrap Chenille bedspread (that's
Chenille fabric right!) The little “knobs” in the material made a good
cushion! Put a couple of layers together and stapled it to the wood frame.
Stretched the white vinyl over the padded frame and stapled it to the
underside. The Tonneau covered the whole rear section of the car flush with the top of the front seat. Looked great! The only other thing to do on the interior was to
make the dash look custom. The A and B interior pillars, window frames and
dash were painted white which looked OK but needed some “Green” to match the
two tone seats. Decided to put some green highlights on the edges so masked
off all the parts not to be painted and use a quick spray for a
mist of green but not a solid color. I thought it
before stretching white Naugahyde over the frame. Foam was
readily available at the time and money was always an issue. Found some
great material that acted like foam. A scrap Chenille bedspread (that's
Chenille fabric right!) The little “knobs” in the material made a good
cushion! Put a couple of layers together and stapled it to the wood frame.
Stretched the white vinyl over the padded frame and stapled it to the
underside. The Tonneau covered the whole rear section of the car flush with the top of the front seat. Looked great! The only other thing to do on the interior was to
make the dash look custom. The A and B interior pillars, window frames and
dash were painted white which looked OK but needed some “Green” to match the
two tone seats. Decided to put some green highlights on the edges so masked
off all the parts not to be painted and use a quick spray for a
mist of green but not a solid color. I thought it
 looked
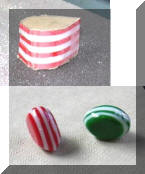
good! Now for some green knobs. The "In Thing" at the time were
laminated plastic teardrop knobs. Found the pics on the left on the Internet
showing how
they are made! The ones I purchased were probably also hand made. They
were pretty expensive considering my small budget. Mine of course were green and white. Photos shows
how the pieces were laminated than ground and polished. looked
good! Now for some green knobs. The "In Thing" at the time were
laminated plastic teardrop knobs. Found the pics on the left on the Internet
showing how
they are made! The ones I purchased were probably also hand made. They
were pretty expensive considering my small budget. Mine of course were green and white. Photos shows
how the pieces were laminated than ground and polished.
Now for the exterior. Couldn’t
absorb all the material in “Car Books" and not want the "clean look" popular at the time. It was
off with the parking lights that were on top of the fenders (NJ Inspection
would have to live with the truck amber clearance lights purchased at Pep
Boys and installed in the side grill openings (the side grills were missing.)
Had to remove the hood and trunk chrome and handle. The holes left in the
trunk and fenders were no problem using fiberglass, or so it said in the “How To Do” articles
in the car books. Considered one of the electric solenoid kits from JC
Whitney to open the truck but a modified junk yard choke cable operated from
under the rear Tonneau fit the budget and worked! Spent a lot of time
in junk yards for the project!
Pop was a very good mechanic, not what he
did for a living but for an amateur he would tackle anything. I would help
with brake jobs, oil changes, wheel bearings etc. Uncle Fred
managed a Chevy Service Department, so we could get special tools and advice
when needed - more about Uncle Fred later. However Pop nor Uncle were
body men, so had no experience with the “fiberglass” the articles said was
easy to use! Well I did learn to use it! I learned excess
hardener meant it set too fast and not enough meant in didn’t harden and had
to be removed. Messy and difficult to do! Also learned a heat lamp
was needed when it was cold and to get ready for lots of
sanding." The detached garage where I
worked had no heat. If they had Bondo in the
mid 50’s I didn’t know about it or it was too expensive! I used a technique
found in one of those “You Can Do It" articles. I cut the glass cloth into
very small strands with scissors and mixed it with the two part polyester resin and the glass flour you could buy to make a paste.
Applied quickly it was good for the next major project, the front grill.
The car had a center grill but it had a big dent.
Looked to purchase one from the “junk yard” but there were no ’41 Fords
in the meadow lands junk yards that I mostly visited. These are no
longer in NJ, they have built up the area with things like Giant Stadium! They were
also next to the garbage dump for most of Northern New Jersey. They
would get cars in and put one on top of the other. Great for some
parts but not ’41 Fords. In any case must have seen a '40 or ’41 with a
filled center grill in one of the magazines so thought that would be a
"cool" solution (actually tuned out not to be so "cool," more like a "warm"
idea!) Got some heavy sheet metal and cut it with tin snips so it would fit over the
grill. Used the bolts fastening the grill to the fenders and inserted
tabs made in the sheet metal to secure the “grill cover.” I recall
having to use quite a bit of force to bend it in shape but it looked good
accept the edges needed to be faired into the fenders. Did that with
fiberglass tape and my mixture of cut glass, glass flour and resin. Worked fine and didn’t
crack!
"Nosing" the hood was another task. Pop had a
friend with a body shop not to far from the house. (He was very helpful for a
number of projects such as attaching the exhaust on the Olds engine to the
dual exhausts.) As I recall, one of those magazine articles said the
two piece hood would crack with just fiberglass holding it together and recommended
welding first. Took the hood to dad’s body shop f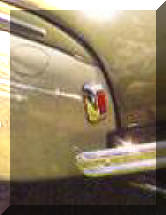 riend. He brazed
some 1 inch long tacks along the seam using a wet rag to reduce distortion. Took the hood home and
layered on strips of fiberglass cloth to create a smooth “nosed” hood. Lots
more sanding. Only one thing left, the taillights. Don’t know why, but
didn’t like the ‘41 taillights (photo left.) Guess had to have something "custom." An ‘in” approach was to use '51 riend. He brazed
some 1 inch long tacks along the seam using a wet rag to reduce distortion. Took the hood home and
layered on strips of fiberglass cloth to create a smooth “nosed” hood. Lots
more sanding. Only one thing left, the taillights. Don’t know why, but
didn’t like the ‘41 taillights (photo left.) Guess had to have something "custom." An ‘in” approach was to use '51 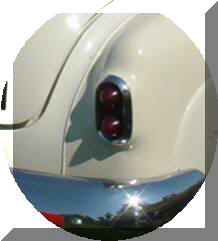 Buick taillights. Looked easy, just get a pair from the junk yard. Junk yards at the time, or at least the ones I visited in the
Kearny Meadows, didn’t strip anything like taillights. In fact most of the
cars were sold for scrape after folks stripped major items. You might
have to climb up on a car to get at them but for a few bucks
I got the Buick taillights. Photo right is what they looked like on a 51
Buick. Looked easy, all I had to do was grind down the back of
the bezels to match the contour of the Ford fender. I recall it was a
study in geometry, easer said than done. But after a lot of trial
fitting and grinding they looked fine.
Buick taillights. Looked easy, just get a pair from the junk yard. Junk yards at the time, or at least the ones I visited in the
Kearny Meadows, didn’t strip anything like taillights. In fact most of the
cars were sold for scrape after folks stripped major items. You might
have to climb up on a car to get at them but for a few bucks
I got the Buick taillights. Photo right is what they looked like on a 51
Buick. Looked easy, all I had to do was grind down the back of
the bezels to match the contour of the Ford fender. I recall it was a
study in geometry, easer said than done. But after a lot of trial
fitting and grinding they looked fine.
Since the trunk trim was removed, needed a
place for the license plate. Attached a home made holder below the rear bumper.
Made a license plate light from some ¾ inch copper tubing which I slit and
installed a light bulb socket. The light was hidden by the rear
bumper. I remember the design since I was stopped
by the police for not having a license plate light and when I went back to
the rear and touched it went back on! Got out of a ticket with, “You’d
better fix that!”
The last thing needed was paint.
Talked about getting the car painted but primer was
fine for now and all I could afford! Pep Boys had a thick primer,
guess we’d call it primer surfacer today. One coat was all that was
needed. How to apply? Pop let me use one of his very special
"natural hair" 4 inch brushes!! Looked fine!
Guess I used a smaller brush around the windows since I recall the overall
job was very neat. Couldn't
see the brush strokes! We did have some neat paint jobs available at the time and shops that
could apply candy apple colors etc. Flames and pin striping were “in”
and at car shows you could see the latest craft. But for my daily
driver, primer was fine and fit the budget. Never did paint it!
|
|
The Engine
(First One)
The car came with a 50 Merc engine. No
that's not a picture of my flathead on
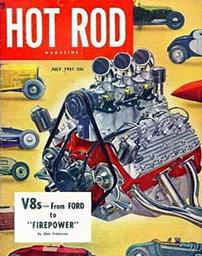 the left but sure wanted those three
two's. The car came with a 4:11 rear end ratio so it felt pretty
fast, at least in the driveway which, without a license, was where I drove! . That was
one of the stock ratios with
Ford. Had a friend who had “hopped up” his 1950 Merc. It was nosed
and decked, neat paint and the engine had two - two barrel carbs and
aluminum heads. However it wasn’t very fast. Couldn’t beat my other friend with a 54
Pontiac! I didn’t want my "hot rod" to be slow so found someone selling a three
two barrel aluminum manifold with three Stromberg 97’s. The magazines said
that was the “ticket!” It was summer; I was out of school and was still
working in the supermarket at the end of the week at nights and on
Saturdays. Left a lot of time so why not "port and relieve" this engine!
Porting was not a big deal in a flathead as the passages are short. But
needed to get the gas in and out of the valves to the piston area. That meant
"relieving" the block, as it was called. This was especially needed with the thin copper gaskets I was
going to use to increase compression. Using thin head gaskets was as far as I
was going since by friend with the 50 Merc had just blown 3 spark plugs out
of his aluminum heads after putting too much ether in his tank! That was a
trick we used when we had a "money race." Not sure how much it helped but you
could buy cans at the drug sto the left but sure wanted those three
two's. The car came with a 4:11 rear end ratio so it felt pretty
fast, at least in the driveway which, without a license, was where I drove! . That was
one of the stock ratios with
Ford. Had a friend who had “hopped up” his 1950 Merc. It was nosed
and decked, neat paint and the engine had two - two barrel carbs and
aluminum heads. However it wasn’t very fast. Couldn’t beat my other friend with a 54
Pontiac! I didn’t want my "hot rod" to be slow so found someone selling a three
two barrel aluminum manifold with three Stromberg 97’s. The magazines said
that was the “ticket!” It was summer; I was out of school and was still
working in the supermarket at the end of the week at nights and on
Saturdays. Left a lot of time so why not "port and relieve" this engine!
Porting was not a big deal in a flathead as the passages are short. But
needed to get the gas in and out of the valves to the piston area. That meant
"relieving" the block, as it was called. This was especially needed with the thin copper gaskets I was
going to use to increase compression. Using thin head gaskets was as far as I
was going since by friend with the 50 Merc had just blown 3 spark plugs out
of his aluminum heads after putting too much ether in his tank! That was a
trick we used when we had a "money race." Not sure how much it helped but you
could buy cans at the drug sto re
and it was a common thing to do. Guess it did something since it caused his
plugs to strip out of the aluminum heads and dent his hood!! re
and it was a common thing to do. Guess it did something since it caused his
plugs to strip out of the aluminum heads and dent his hood!!
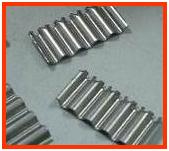
Relieving looked easy,
just get some grinding wheels and grind down the passage from each valve to
the cylinder. Photo left shows a stock flathead block with stock vale
pockets. The photo below right shows the grinding that was done to
"relieve" the passage from the intake and to the exhaust valve so gases had
an easier time making the trip! Went to the local hardware store which was
within walking distance and purchased some grinding wheels that fit my
drill. I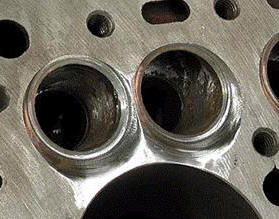 remember vividly they had a small bucket on the counter of various shapes
all with shafts attached. I remember it vividly because after about two
weeks of waking there about every day I had purchased most of them!! They were not the thing to use on cast
iron. But the job was done. Now I would drive up and down the driveway.
Had the hood off since I had been standing inside the engine compartment
with my drill and grinding wheels! Lucky it had no hood since that three carb set-up liked to
backfire! With no air cleaners, flames would shoot out of all three carbs! I blamed the carbs!! I went to the auto parts store where I always
got a mechanic’s discount because of Uncle Fred! I recall asking if I could
trade in the 97’s and get rebuilt 94 carbs. The fellow at the counter, who I
knew said, "no way - those are ancient!" I informed him these were the best carbs you could buy (said that in all the magazines!) He laughed. I was
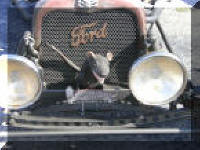
mad! Fortunately a local drag racer who I had seen at the drag strip
with his blown '34 Ford Gasser (but
didn’t know personally,) said to the fellow behind the counter that he’d give the $5
trade allowance each for these
remember vividly they had a small bucket on the counter of various shapes
all with shafts attached. I remember it vividly because after about two
weeks of waking there about every day I had purchased most of them!! They were not the thing to use on cast
iron. But the job was done. Now I would drive up and down the driveway.
Had the hood off since I had been standing inside the engine compartment
with my drill and grinding wheels! Lucky it had no hood since that three carb set-up liked to
backfire! With no air cleaners, flames would shoot out of all three carbs! I blamed the carbs!! I went to the auto parts store where I always
got a mechanic’s discount because of Uncle Fred! I recall asking if I could
trade in the 97’s and get rebuilt 94 carbs. The fellow at the counter, who I
knew said, "no way - those are ancient!" I informed him these were the best carbs you could buy (said that in all the magazines!) He laughed. I was
mad! Fortunately a local drag racer who I had seen at the drag strip
with his blown '34 Ford Gasser (but
didn’t know personally,) said to the fellow behind the counter that he’d give the $5
trade allowance each for these
 carbs (picture left is a Stromberg 97.)
I thanked him and walked away with 3 rebuilt 94’s!
They were better but I was still way over carbureted. Needed progressive
linkage which I bought but when those last two carbs opened I still had much
more air than I could use and the car would go lean. Needless to say I
wasn’t pleased that even if I got this corrected I was going to be very
fast. carbs (picture left is a Stromberg 97.)
I thanked him and walked away with 3 rebuilt 94’s!
They were better but I was still way over carbureted. Needed progressive
linkage which I bought but when those last two carbs opened I still had much
more air than I could use and the car would go lean. Needless to say I
wasn’t pleased that even if I got this corrected I was going to be very
fast.
I got my license the first month of
school. Driving the car I realized it burned quite a bit of oil! I wasn’t
worried about the cost but the smoke coming from the tail pipes was embarrassing!!
Knew an engine rebuild was in order and the car just wasn’t very fast. Why put
more good money and not accomplish the "go fast" objective.
|
|
The Olds Engine
By luck, a friend said he had a
50 Olds engine in pieces in his garage! I knew it would have much more
power than the flathead. For a few bucks I bought the parts
hoping they were all there! A true basket case! It
came with a transmission adapter from the Olds engine to the '41 3 speed trans, a 3/8 inch thick plate with the
appropriate holes matching both pieces. My friends helped get the block in my basement.
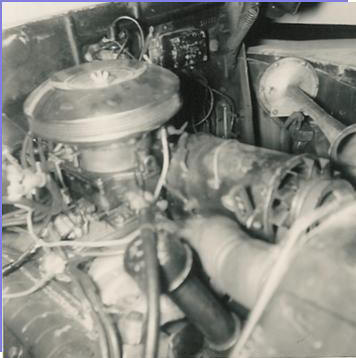 The
pistons, rods, crank main caps, timing chain and all other parts (I hoped,)
were in a big wood peach basket! Before I spent time and money on the
Olds engine I wanted to be sure it wasn’t going to burn oil! I wasn’t going
to have a "smoker" again! (Picture at left is the only one I
have from that time. It is the Olds in the '41. Performance, not
appearance was my first goal! The
pistons, rods, crank main caps, timing chain and all other parts (I hoped,)
were in a big wood peach basket! Before I spent time and money on the
Olds engine I wanted to be sure it wasn’t going to burn oil! I wasn’t going
to have a "smoker" again! (Picture at left is the only one I
have from that time. It is the Olds in the '41. Performance, not
appearance was my first goal!
The auto parts store I dealt
with also had a machine
shop. They sent someone over to measure the size, taper and roundness
of the cylinder walls. As I watched him make the measurements he said;
"it’s borderline, it may be OK! "Maybe and OK" were not what I wanted
to hear! However, I paid very little for the engine so why not have it
bored out! An article in Hot Rod said you could bore a ’50 Olds block
1/8 inches and use ’55 Olds pistons. Sounded good to me, it would then
have 324 cubic inches versus the 303 in the '50. That was more than
the 265 and the new 283 Chevy V8 that had just been introduced. In
addition, the Chevy engine was very new and couldn't find those in the junk
yard at a price I could afford. There were no "crate engine" programs at the time and I didn't have the money
if their were!
Went over to
the auto parts house and said "bore it out 1/8 inches I don’t want an oil
burner." They refused, swore they would be in the water jacket. I said,
being a determined young man, "Hot Rod says you can do it!!" I didn’t know
about potential core shift etc at that time. They said; "Take all
responsibility for creating a hole and buy the pistons from
us and we’ll do it." The machine shop had never bored out anything more than a 1/16 inch
before so they charged extra. To bore them out it would be $5.00 a hole
is what I remember.
That was about the same price they charged for each new piston as I recall. A lot of money for me at the time but I said go!
After boiling the block they installed new cam bearings. I bought a
'55 Olds cam from the Olds dealer. The magazines said that was the low cost approach rather than buy an expensive Isky cam.
It had higher lift and duration and retained the hydraulic lifters and non
adjustable rockers. The machine shop also ground
the crank and sold me a rebuild kit, new bearings, gaskets, rings etc.
My friend with the 50 Merc was going to
auto mechanic school and said he would do a valve job on my heads as part of
his classes. Took him a while to finish but when I got them back found
he had polished the chambers and ports. You could see yourself in the
chambers!! Don’t know how much good it did but it sure looked great!
I recall rebuilding the 4 barrel carb
that came in that fruit basket of parts! I did the wok on a
portable coffee table in the
sun parlor. Cleaned all the parts in the basement with gasoline and boy did it smell
up the house! Took a few days but got it all back together following the
instruction sheet that came with the rebuild kit!
I received a phone call from the machine shop
saying two of the rods were stretched and there was a problem with the
thrust
surface on the crankshaft! Fortunately my buddy with the Merc
had a set of 50 Olds rods and a crack. He donated them to the project! I gave
the extra eight rods to the machine shop and asked
them to pick the ones that matched best! They found a good eight
from the 16! His crack was also find for regrinding .
Must
admit it didn’t seam like a problem putting the engine together without a
manual. Today I won’t touch a part without first consulting the service
manual. Everything went together correctly and when I put the bottom end
together I used Plastigage and checked all clearances. I remember the
machine shop had to wait for the pistons so they could mic each and finish
hone the bores to match. They even understood the importance of close
tolerances in the '50's! I recall phoning Uncle Fred and asking him to
drop off a torque wrench on his way home from work. Hot Rod said it was a must. He said.
"that’s not
what you need; you just need a pry bar." Hot Rod couldn’t be wrong and I
wanted this engine to be right. He came over the house with both. He said,
“I’ll pull the bottom end down with the pry bar and you check it with the
torque wrench." Wonder if he was "feeling" the bolt stretch or just from his
past experience was able to tighten up the main bearing caps and rod bolts
without me ever doing more than verify they were all in excess of the torque
since I didn’t get them to budge! I did put the heads on using the wrench
and the proper torque sequence per the articles I read.
Everything but the carburetor was now
together in the basement. Had not considered how much more it would weight
then when the parts were brought down separately!
Put it on a two wheeled hand cart. Took several friends with a rope
pulling and a few pushing and lifting to get the engine up the basement
stairs and out the door!
The flathead was easy to take out of the
Ford with a chain block and tackle. However this Olds was much heavier.
Could tell when we tired to lift it. Even the garage roof beam was
bending and we had to nail some 2X6 boards together to make a temporary
column to brace it! I had purchased some Olds-to-Ford motor
mounts. As mentioned, with the engine parts I purchased was a flat plate adapter to
connect the stock Ford trans to the Olds. There was a pilot bearing adapter that pressed into the flywheel and
extended the hole for the transmission shaft to make up for the 3/8 inch
thick adapter. Another friend lent me a Ford transmission input shaft so I could bolt up the clutch.
Used the clutch that was in the Merc engine. His brother had built a ’28 Ford and offered to move my steering box into the
frame to clear the starter. He had an oxyacetylene cutting and gas
welding outfit. But I elected to buy what was called a "starter
switchover 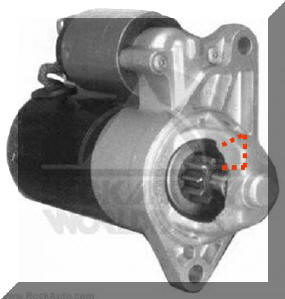 kit" that moved the starter from the left to right side so it would not
interfere with the steering. It was an
expensive purchase and when I received it I realized I had to cut off a part
of the starter nose to clear the housing. I recall pondering how I would
get this done. Probably kept me up one night! I put a new blade on the hacksaw and started. Boy that
graphite in cast iron sure makes it easy to cut. Made the cut in no time!!
Photo right shows in red about where I had to cut the cast iron starter
nose.
kit" that moved the starter from the left to right side so it would not
interfere with the steering. It was an
expensive purchase and when I received it I realized I had to cut off a part
of the starter nose to clear the housing. I recall pondering how I would
get this done. Probably kept me up one night! I put a new blade on the hacksaw and started. Boy that
graphite in cast iron sure makes it easy to cut. Made the cut in no time!!
Photo right shows in red about where I had to cut the cast iron starter
nose.
We raised the engine and pushed the car
under it. We lowered the engine, and lowered it and kept on lowering it!
Boy was it heavy. Thought I had raked the car. It was several inches lower
in the front than with the flathead! I also recall those motor mounts didn’t fit
the Ford rubber donuts holes very well.
I recall having to file the motor mount holes quite a bit to get the bolts onto the rubber donuts.
Finally it all fit.
The left side exhaust manifold was
hitting the steering column! The solution was to use another
right had manifold which I picked up at the junk yard. I remember
struggling getting the nuts off and the fellow who worked in the yard
to cut up parts put his cutting torch on the bolt and as I cringed he said, "Don’t worry it
won’t cut the cast iron." He proceeded to cut off the offending
bolt heads
and the manifold was unscathed.
Pop's body shop friend welded the exhaust pipe pieces I had fabricated by
slitting exhaust pipes and hammering them together to fit.
Time to start the engine! When I
assembled the hydraulic lifters
I had put a small amount of oil in each but as I cranked it over
none of the rockers moved. It took some time to get the pressure up and the
valves start to actuate. Put the valve covers on and hoped I had set the
distributor properly and the timing was good enough to at least start it
up. Even then it was known that you should run a new engine in for a ½ hour
or so. That I did and it ran fine! Set the timing with one of the
cheap dim
lights we had at the time. I recall another friend having built an engine
and he burned it out on his first run with no oil pressure. I loosened
the oil sender and saw oil squirt out! All seamed fine.
Had a local auto electrical wizard help get
the generator to work. He had to "polarized" it by shorting a terminal
to ground. Worked fine after that. However when the engine was
hot it cranked very slow. Fortunately a local company making
batteries, mostly for trucks, had what they called a 6-12 and 12-24 system.
The 6-12 was a two 6 volt batteries built into one case that had a solenoid
switch on top. It put the two batteries in series for starting and
then switched them with a big solenoid to a parallel connection. All accessories, lights
etc were connected to an "always 6 volt" location but it put 12 volts on the
starter making it made the engine spin the great. Just couldn’t run the starter too
long but with the increased starter speed the car started very quickly.
Had a local radiator shop block
off one of the inlet and outlets since the flathead had two of each. The car
would overheat and when I asked the radiator shop what they could do he had me
install a thermostat which I had elected not to use. As he explained;
"Your cavitating at the center of the water pump. Your boiling before
the radiator gets to 212 degrees!" He was right, it was a big help. No overheating except
at highway speeds. Went back and he made it a 15 psi pressure system. I
recall, he pressurized the radiator and found any leaky places and soldered
them. It worked. Used a 15 psi cap and let the temperature increase. For
all but sustained highway driving in the summer, which I did very little, it
was fine.
The car was really fast. However the skinny 16
inch diameter rear tires had little traction. When 1st gear
striped soon after the Olds was installed there was no problem. Taking off
in second could spin the tires until you backed off the gas! Also, to have
the gas peddle clear the higher Olds engine I had a piece brazed onto the
throttle shaft coming up at the firewall. It made the peddle have a
very short movement. Easy to get the wheels spinning. Drove the
car with two gears. The 4:11 rear and the torque of the Olds were more
than enough. One friend would bet, and mostly win, that he could beat a car on foot from telephone pole
to telephone pole from a standing start. I won that one easily. My buddy
with the '54 Pontiac sedan was very upset that I jumped several car lengths
on him in the quarter mile we had marked off on a newly built but little
used road and left him in the dust! We had installed 3 X
2's on his car, it was light and quick but not a match for the '41! Even beat a few
motorcycles! |
|
Clutch Bushing
One other anecdote is worth mentioning
since it was a learning experience I never forgot in my working career.
The clutch peddle linkage was sloppy and I found a very warn bushing at the
base shaft. The auto parts store did not carry the part. I asked
Pop what he thought and he suggested we go to a person he knew that worked
in the Ford Dealers parts department. He said this fellow had worked
in a junk yard and will know if something currently available would work. I recall
he and Pop were chatting and I asked the question; "Do you have a bushing
for the clutch shaft in the '41 Ford?" He said sarcastically; "What
does that sign say?" pointing to the sign above the counter. I said
"Ford Parts." He said "it doesn't say antique parts does it?"
I was mad! He went in the back and came back with a bushing and said "this will fit." I looked
at the spherical internal shape and said my bushing isn't spherical it won't work.
He took it back (or so I thought.) I drove home with Pop and was
talking about asking another uncle who was a machinist to make a bushing for
me. When we got home Pop pulled out of his pocket the part his friend
had showed me when I went in the car!! He said see if it fits! I
cleaned out all the extra grease I had put on the shaft, and wouldn't you
know - it was perfect! I had not seen the spherical shape on that part
of the shaft with all the extra grease I had pumped in with a grease gun!
What I learned from that experience was folks who work in an area are very
knowledgeable! Over the years I have learned far more from welders
that I have taught them! It may have been different information but
since I worked mostly with automatic submerged arc machine welders I always respected
what the operator knew about his machine and what settings worked! I
also learned the important of work grounds and their location. These
welders had learned that the "hard way!" |
|
Bottom Line
The car served me well and helped me get
into college studying engineering. I learned a lot and look back fondly at
my aggressive "can do attitude." We didn’t call them Rat Rods then but
compared to the guys buying ’57 fuelie Chevy’s, 406 Fords and Tri-power
Pontiacs right from the dealers, guess they were.
Download PDF of pictures of Rat
Rods at "The Run For
 The
Sun" Car Show in Myrtle Beach SC. The
Sun" Car Show in Myrtle Beach SC.
Click
PDF ICON right or the Rat Rod Pic
on left.
CLICK TO See Video of "Rat
Rods Then and Now"
Includes Pictures of Rat Rods shown at
Myrtle Beach SC "Rub to the Sun" Car Show |
|
 Purchase
Gas Saving Products Purchase
Gas Saving Products |
Purchase
Training
Products |
|
Purchase
Flow Rate Limiter |
Purchase Wire Feeding Aids |
| |
Purchase Orifice Flow Control System |
|